

How to replace spark plugs correctly

One of the most essential aspects of vehicle maintenance is a proper tune-up, which includes replacing worn-out spark plugs. Spark plugs play a crucial role in the engine’s performance, as they create the necessary spark to ignite the air-fuel mixture in the combustion chamber. Over time, these components can wear down, leading to decreased fuel efficiency, rough idling, and potential engine misfires.
Replacing spark plugs might seem daunting, but with the right tools and guidance, it can be a straightforward task. This step-by-step guide will walk you through the entire process, ensuring that your vehicle continues to run smoothly and efficiently. By following these instructions, you’ll not only enhance your car’s performance but also prolong the life of the engine.
In this article, we will cover everything from selecting the correct spark plugs for your vehicle to the detailed procedure for replacing them. Whether you’re a seasoned mechanic or a first-time DIY enthusiast, you’ll find useful tips and insights to help you execute this important maintenance task effectively.
Choosing the Right Spark Plugs for Your Engine
Selecting the correct spark plugs is crucial for ensuring optimal engine performance and longevity. Spark plugs play a vital role in igniting the air-fuel mixture in your engine’s combustion chamber, directly influencing efficiency, power output, and fuel economy. Choosing the right plugs involves considering several key factors.
First, refer to the manufacturer’s specifications in your vehicle’s owner manual. Each engine is designed to operate with specific types of spark plugs, which are classified by their heat range, size, and material. Using the recommended spark plugs will ensure proper function during a tune-up and prevent potential misfires or engine damage.
Next, consider the different materials used in spark plugs. Copper plugs offer good conductivity but have a shorter lifespan. Platinum and iridium plugs are more durable, providing better performance and longevity, making them ideal for high-performance engines or vehicles that experience extreme conditions.
Additionally, evaluate the heat range of the spark plugs. The heat range determines how quickly the plug dissipates heat. Choosing a spark plug with the wrong heat range can lead to pre-ignition or fouling. A colder plug may be necessary for high-performance engines, while a warmer plug is often suitable for standard engines.
Lastly, don’t overlook the design of the spark plug. Features such as the number of ground electrodes or the type of insulator (ceramic versus metal) can also affect engine performance. Multi-electrode designs can improve ignition stability, which is beneficial for an efficient tune-up.
By understanding these factors and selecting the appropriate spark plugs for your engine, you can enhance your vehicle’s performance and ensure a successful spark plug replacement during your next tune-up.
Step-by-Step Process to Remove Old Spark Plugs

Removing old spark plugs is an essential maintenance task that helps keep your engine running smoothly. Follow these steps to ensure a successful removal process.
1. Gather Necessary Tools
Before starting, collect the required tools: a spark plug socket, a ratchet wrench, a torque wrench, and possibly a spark plug gap gauge. Having everything ready will streamline the process.
2. Ensure Engine is Cool
Always work on a cool engine to avoid burns and damage. Allow sufficient time after driving before starting the removal process.
3. Disconnect the Battery
To prevent any electrical issues, disconnect the negative terminal of the battery. This step ensures safety while working on the engine.
4. Locate the Spark Plugs
Identify the location of the spark plugs in your engine. They are typically found on the cylinder head. Refer to your vehicle’s manual if needed for specific instructions.
5. Remove Ignition Coils or Wires
If your engine has ignition coils, carefully detach them from the spark plugs. For vehicles with spark plug wires, gently pull the wires off the plugs, ensuring not to damage them.
6. Clean the Area Around the Spark Plugs
Before removing the plugs, clean the area surrounding each spark plug with a brush or compressed air. This prevents debris from falling into the engine during removal.
7. Use the Spark Plug Socket
Fit the spark plug socket onto the spark plug and connect it to the ratchet wrench. Turn the wrench counterclockwise to loosen and remove the spark plug. If the plugs are stuck, apply penetrating oil and wait a few minutes before attempting again.
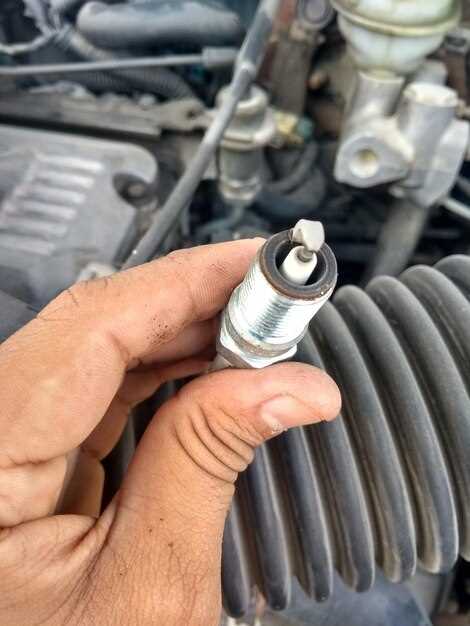
8. Inspect the Old Spark Plugs
Once removed, examine the condition of the spark plugs for signs of wear, carbon buildup, or damage. This information can help diagnose potential engine issues.
9. Store or Discard Properly
If reusing the plugs, store them in a clean, dry location. Otherwise, dispose of them according to local regulations.
By following these steps, you can successfully remove old spark plugs, setting the stage for a proper replacement and enhanced engine performance.
Proper Installation Techniques for New Spark Plugs
To ensure optimal engine performance, proper installation techniques for new spark plugs are essential during a tune-up. Start by selecting the correct type of spark plug for your specific engine model, as this ensures compatibility and efficiency.
Before installation, prepare the area by cleaning the spark plug holes with compressed air to remove any debris that could enter the engine. This step is crucial to prevent contamination that can lead to misfires or damaged components.
Check the gap on each spark plug using a feeler gauge, adjusting if necessary to the manufacturer’s specifications. An improper gap can affect ignition timing and engine performance negatively.
Additionally, apply a small amount of anti-seize compound to the threads of the spark plugs to facilitate future removal. Be careful not to apply it to the electrode, as this can lead to improper firing and potential damage.
When threading the new spark plug into the cylinder head, do so by hand initially to prevent cross-threading. Once hand-tightened, use a torque wrench to tighten the plug to the manufacturer’s specifications, ensuring a secure fit without over-tightening, which could damage the threads.
After installation, it’s vital to connect the ignition wires or coils properly, ensuring a secure connection to each spark plug. Finally, perform a tune-up test to verify that the engine is running smoothly and efficiently with the new spark plugs installed.


