

Rebuilding an outboard motor during restoration

Rebuilding an outboard motor can be a rewarding challenge for many boating enthusiasts. Whether your engine has experienced wear and tear over the years or has suffered damage from external factors, the process of repairing and rebuilding it can bring new life to your vessel. Understanding the intricacies of your outboard engine is crucial for a successful restoration, as it involves various components that must be meticulously examined and serviced.
In this comprehensive guide, we will take you through the essential steps required to rebuild your outboard motor effectively. From assessing the initial condition of the engine to sourcing necessary parts and tools, every aspect is important for ensuring a successful rebuild. You will learn about the common issues that may arise during the repair process, as well as how to troubleshoot and resolve them.
As you embark on this journey, it is essential to have a clear understanding of the engine’s operational mechanisms and the potential challenges you may face. This guide aims to equip you with the knowledge and confidence needed to tackle the rebuilding process, ultimately leading to a more reliable and efficient outboard motor.
Assessing Engine Condition Before Rebuild
Before beginning a rebuild of your marine outboard motor, it is crucial to assess the overall condition of the engine. This assessment will help you determine the extent of the damage and the necessary repairs required to restore optimal performance.
Start by examining the exterior of the engine. Look for signs of corrosion or physical damage, particularly around the powerhead and cowling. These areas are prone to wear due to exposure to water and salt. Any cracks or rust spots indicate that the engine may need parts replaced during the rebuild.
Next, inspect the internal components by removing the cylinder head. Check for signs of wear on the pistons, cylinder walls, and bearings. Scoring on the cylinder walls or excessive play in the pistons can signal serious issues that may require more extensive repairs than a simple rebuild.
Also, evaluate the compression of the engine. Using a compression tester, measure the pressure in each cylinder. Healthy marine engines generally have consistent compression across all cylinders. A significant difference in readings may indicate underlying issues like worn piston rings or valves, prompting the need for a thorough inspection and possible replacement during the rebuild process.
Do not overlook the fuel system and ignition components. Inspect the fuel lines, carburetors, or fuel injectors for clogs or wear. An inefficient fuel system can impact overall engine performance after the rebuild. Additionally, check the spark plugs and electrical connections for any signs of damage or corrosion.
Finally, it’s essential to assess any accessory components, such as the water pump and cooling system. An effective cooling system is vital for maintaining engine performance and longevity. Inspect the impeller and housing for wear, ensuring that they will function efficiently once the rebuild is complete.
By thoroughly assessing the condition of your outboard motor before initiating the rebuild process, you can make informed decisions about the necessary repairs and modifications, ensuring your marine engine operates smoothly and reliably.
Step-by-Step Process for Disassembling the Outboard Motor
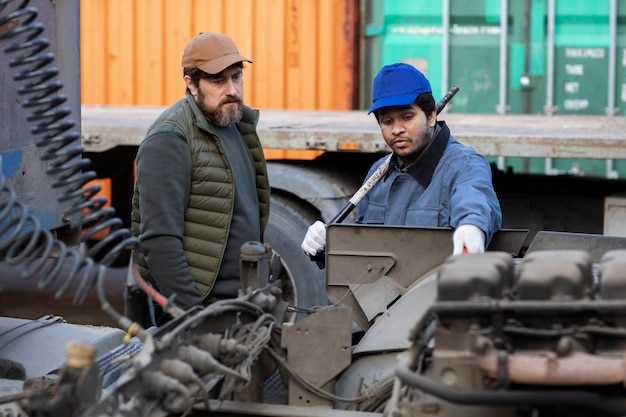
Disassembling an outboard motor is a crucial step in the repair and rebuild process. Following a systematic approach ensures that each component is handled properly, facilitating effective repairs. Below is a detailed guide to assist you in this process.
Step 1: Preparation
Before starting the disassembly, ensure you have the necessary tools on hand, including wrenches, screwdrivers, pliers, and a clean workspace. Take note of any specific engine model documentation for reference. Make sure the work area is organized to keep track of parts as you remove them.
Step 2: Disconnect the Battery
Safety is paramount. Begin by disconnecting the battery to prevent any electrical accidents. Remove the negative terminal first, followed by the positive terminal, to completely isolate the electrical system.
Step 3: Remove the Engine Cover
Loosen the screws or fasteners that secure the engine cover and gently lift it off. This action exposes the internal components of the motor, allowing for further disassembly.
Step 4: Detach the Fuel Lines
Carefully disconnect the fuel lines from the engine. Use a container to catch any fuel that may spill during this process. Ensure that the fuel system is empty before proceeding.
Step 5: Remove the Carbs and Intake Manifold
Unscrew the carburetors and intake manifold from the engine. Pay attention to any gaskets, as they may require replacement during rebuilding. Set these parts aside in a labeled container to keep them organized.
Step 6: Take Off the Exhaust Manifold
Next, remove the exhaust manifold. This step typically requires removing bolts that secure it to the engine block. Check for any signs of wear or damage as you disassemble this component.
Step 7: Separate the Powerhead
Carefully unscrew and detach the powerhead from the lower unit. Make sure to support the lower unit as you do this to avoid damage. This separation allows for more detailed inspection and repair of both components.
Step 8: Disassemble the Lower Unit
Once the powerhead is removed, focus on the lower unit. Unscrew the propeller and gear case, then detach the shift linkage. This step may require additional tools to properly handle the gears and ensure they remain intact.
Step 9: Inspect and Organize
As you disassemble each part, inspect for wear and damage that may need to be addressed during the rebuild. Organize all components, including bolts and nuts, in labeled containers for easy reassembly.
Step 10: Document the Process
Throughout the disassembly, take photos or notes. This documentation will serve as a valuable reference during the reassembly phase, ensuring that you do not overlook any steps or components.
By following these steps methodically, you will successfully disassemble your outboard motor, paving the way for efficient repairs and an effective rebuild of the engine.
Selecting Replacement Parts and Tools for Reassembly
Rebuilding a marine engine requires careful consideration when selecting replacement parts and tools. The quality of the components directly impacts the performance and longevity of the outboard motor.
Start by identifying the specific parts you need. Consult the engine’s manual or parts list to ensure compatibility. When sourcing replacement parts, prioritize original equipment manufacturer (OEM) components over aftermarket alternatives. OEM parts are designed specifically for your engine, ensuring optimal fit and functionality.
Tools also play a crucial role in the reassembly process. Investing in high-quality tools will save time and prevent damage to delicate engine components. Essential tools include:
- Sockets and Wrenches: Necessary for tightening and loosening bolts securely.
- Screwdrivers: Both flat and Phillips types are essential for various fasteners.
- Torque Wrench: Ensures bolts are tightened to the manufacturer’s specifications.
- Alignment Tools: Critical for proper alignment of engine components during reassembly.
- Sealant and Gaskets: Essential for preventing leaks and ensuring a proper seal.
Another important aspect is the assessment of wear and tear on existing parts. Inspect components like bearings, seals, and gaskets for any signs of damage or degradation. Replacing these parts proactively can prevent future issues and improve the overall reliability of your engine.
When reassembling the outboard motor, maintain a clean workspace to avoid contaminating engine parts. Organize replacement parts systematically to streamline the reassembly process. This structured approach will lead to an effective rebuild, significantly enhancing the performance of your marine engine.


